Showing posts with label ray tracing. Show all posts

Saturday, February 16, 2013

Ray Tracer Part 7 - Tone Reproduction

For the final part of the Ray Tracer, Tone Reproduction, using Reinhard and Ward Compression techniques, were implemented.

Ward Compression

Ward, 1 nit
Ward, 10 nits


Ward, 100 nits
Ward, 1000 nits


Reinhard Compression

This portion I've had a lot of issues with. I realize that in Reinhard, the Max Luminance is supposed to have very little (if any) effect on the luminance of the scene.  Unfortunately, I can't find where in my code this seems to go wrong. The equations seem almost identical to me, and I'm simply at a loss. Instead, I got these interesting images.

My code was as follows (per pixel):
// Part A of Compression            
pixels[y][x].l_red = ( kv * pixels[y][x].l_red ) / log_avg_lum;            
pixels[y][x].l_green = ( kv * pixels[y][x].l_green ) / log_avg_lum;            
pixels[y][x].l_blue = ( kv * pixels[y][x].l_blue ) / log_avg_lum;    
       
// Part B of Compression            
pixels[y][x].l_red = ((pixels[y][x].l_red)/ (1 + pixels[y][x].l_red)) *ld_max; pixels[y][x].l_green = ((pixels[y][x].l_green)/ (1 + pixels[y][x].l_green)) * ld_max;            
pixels[y][x].l_blue = ((pixels[y][x].l_blue)/ (1 + pixels[y][x].l_blue))*ld_max;

// Apply Device Model            
pixels[y][x].l_red = pixels[y][x].l_red / ld_max;            
pixels[y][x].l_green = pixels[y][x].l_green / ld_max;            
pixels[y][x].l_blue = pixels[y][x].l_blue / ld_max;            

// Print Point to Screen            
glColor3f( pixels[y][x].l_red, pixels[y][x].l_green, pixels[y][x].l_blue ); glVertex2d( x, y );

Reinhard, 1 nit
Reinhard, 10 nits


Reinhard 100 nits
Reinhard 1000 nits

Reinhard, with different Key-Value pixel selection

I was still able to use a key-value pixel selection for this, which showed a little better effect. All pictures were taken with a Lmax of 1, to simulate if my Reinhard above was working properly.


Reinhard, Key Value at x=400 y=400
Reinhard, Key Value at x=100 y=100


Reinhard, Key Value at x=250 y=250

Friday, February 8, 2013

Ray Tracer Part 6: Transmission

This part of the ray tracer is adding a transmission ray to the front sphere.


Monday, January 28, 2013

Ray Tracer Part 5: Reflection

Single Reflection Ray on Mirrored Sphere
This assignment's focus was adding reflection to the Ray Tracer. Due to the size of my floor, I moved the reflective sphere around a little for a more aesthetic reflection. I also moved the light sources slightly to the center so the shadows would reflect in the back sphere.

I also implemented using multiple reflection rays to approximate a BRDF. Below you can see the results of some of these experiments.
 
6 reflection rays, in a cone-radius
of .005


8 reflection rays, with a cone-radius of .01


8 reflection rays, with a cone-radius
 of .005


Tuesday, January 15, 2013

Ray Tracer Part 4 - Procedural Shading

For this assignment, we had to add a pattern/texture to the floor of the scene. At different points of intersection, the floor is now different colors.

Initially, the pattern was a checkered Red/Yellow floor, as shown below:


Afterwards, as an "extra", I added another pattern. Now the pattern on the floor is a diagonal, as shown below.

I also allowed for an easy way to make the stripes and grid go at smaller and larger sizes, as shown below.


Thursday, January 10, 2013

Ray Tracer Part 3 - Shading

Phong Illumination on Scene

The purpose of this assignment was to implement the Phong Illumination model in the ray tracer assignment. In this picture there are 3 light models (format: (r, g, b, intensity)):

ambient ( 1, 1, 1, .2 ) 
diffuse ( .4, .4, .4, 1 ) 
specular ( 1, 1, 1, 1

For an "Extra", I implemented another Light Source. 

To show the differences with the different light sources and experiment with colors, I made the spheres an off-white (0.9, 0.9, 0.9). The Normal light source is the same as the light source above. The new light sources have the following model specifications: 

Red Light 
specular ( 1, 0, 0, 1 )
diffuse ( 1, 0, 0, 1)

Green Light
diffuse ( 0, 1, 0, 1 )
specular ( 0, 1, 0, 1 )

Blue Light 
diffuse ( .1, .1, 1, 1 )
specular ( .1, .1, 1, 1 )
3 light sources, Red, Green, and Blue
Red and Normal light
Blue and Normal light


Red and Blue, with Normal Light


Wednesday, January 2, 2013

Ray Tracer Pt 3 : Basic Shading


Phong Illumination / Shading

The purpose of this assignment was to implement the Phong Illumination model in the ray tracer assignment. In this picture there are 3 light models (format: (r, g, b, intensity)) ambient(1, 1, 1, .2), diffuse(0, .3, .3, .6), and specular(1, 1, 1, 1).

For an "Extra", I implemented another Light Source. 

To show the differences with the different light sources and experiment with colors, I made the spheres white. The new light source has the following model specifications: specular(0, .4, .4, 1) and diffuse(.4, .4, 0, 1). The first image is both light sources, and below that are each light source alone.

Both Light Sources
Light Source #2
Light Source #1

Tuesday, December 18, 2012

Ray Tracer Part 2 - Camera Modeling

For this part, the assignment was to start shooting the initial rays at the scene. This is the result from calculating the intersection of the two spheres and the plane, while returning the color of the object when it was struck by the ray.

Wednesday, December 5, 2012

CG2 Ray Tracer Part 1 - Setting the Scene

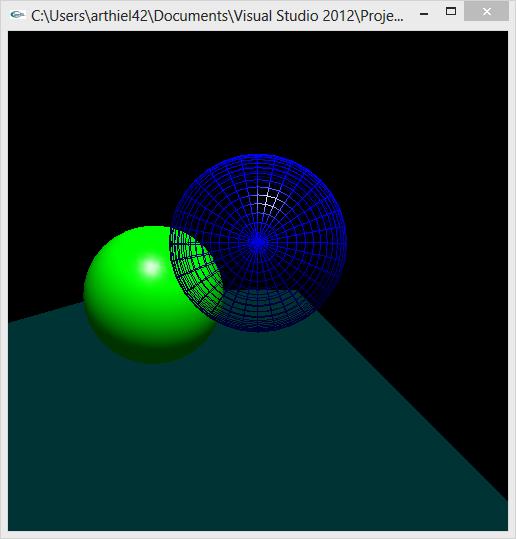
My Scene Set-up
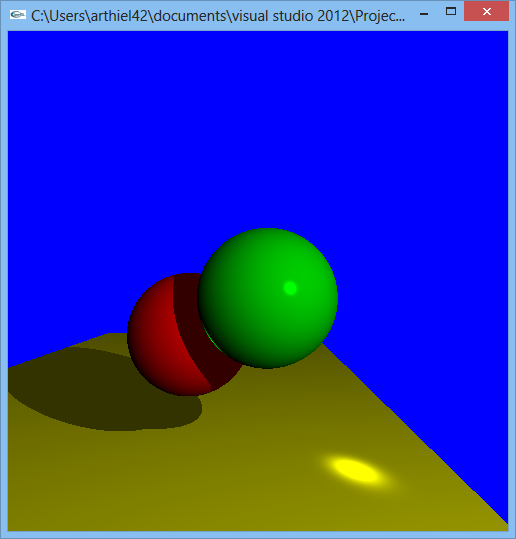
Original Image
For the first part of the ray
tracer assignment, we had to set the scene and collect the coordinates/locations of each object in the scene. In my set-up, the blue wire-frame sphere is the Glass Ball. The green solid sphere is the mirrored ball. Finally, the solid teal floor is the red/yellow checkered floor in the original image.


The coordinates are as follows:


// Blue Ball ( Glass )
glTranslatef( 80, .7, 155 );
glutWireSphere( 8, 32, 32 );


// Green Ball ( Mirror )
glTranslatef( 68, -5, 140 );
glutSolidSphere( 8, 32, 32 );


// Floor
glBegin( GL_QUADS );
glVertex3d( 100, -20, -100 );
glVertex3d( 10, -20, -100 );
glVertex3d( 10, -20, 200 );
glVertex3d( 100, -20, 200 );
glEnd();

// Camera 
gluLookAt(80, 0, 210, 80, -20, -200, 0, 5, 0 ); 

// Light Source
GLfloat light_pos[] = { .3, 1.0, 1.0, 0.0 };
GLfloat spec[]  = { 1.0, 1.0, 1.0, 1.0 };
GLfloat shiny[] = { 100.0 };
GLfloat ambient[] = { 1.0, 0.2, 0.2, 1.0 };